
Introduction
Have you ever looked at your computer and realized your project directory is cluttered with folders named final_v1, final_v2, and final_bug_fix? If you are writing complex embedded C drivers or building intricate hardware simulations, relying on "copy-pasting folders" is a recipe for lost code and endless frustration.
It is time to move away from saving endless copies and step into confident version control. Let's dive into Git and GitHub, the industry standards for managing code, collaborating seamlessly, and maintaining your sanity.
What is Git?
A Time Machine: Git tracks the history of your files, allowing you to easily restore previous versions if something goes wrong.
Effortless Collaboration: It allows multiple team members to merge their work together without overriding each other.
A Safe Sandbox: You can experiment with new features without breaking the main code.
While other systems like Mercurial and SVN exist, Git has become the undisputed champion of version control.
Installation
Follow this link to install Git in your setup.
The Mental Model: Where Does Your Code Live?
To master Git, you need to understand its three primary areas:
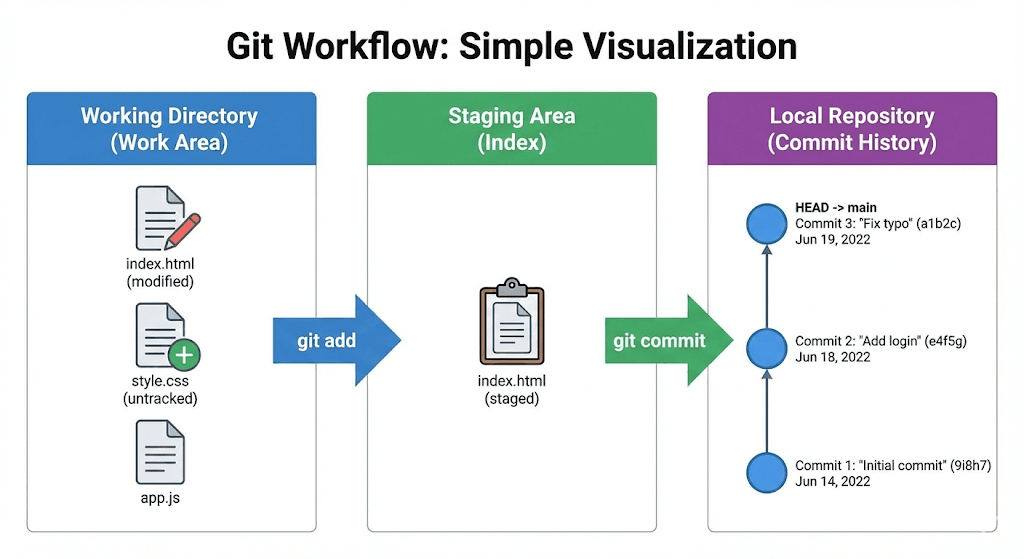
Working Directory: This is your active workspace where you edit files.
Staging Area (Index): Think of this as a waiting room. When you use the git add command, you are preparing specific files to be saved.
Local Repository: When you run git commit -m , Git takes a snapshot of your staging area and saves it as a permanent new version in your local history.
Initializing Your Repository
Before you can track any history, you need to tell Git to start monitoring your project folder.
Initialize Git: Open your terminal, navigate to your project directory cd project-dir and typegit init
This creates a hidden .git folder that will store all your version history.
Set Your Identity: Tell Git who is writing the code. Run git config --global user.name "Your Name" and git config --global user.email "your.email@example.com"
Using --global sets this as the default identity for your whole system, but you can omit it to set the identity only for the current repository.
Stage Your Files: Add your required files into the Staging Area. You can use git add <filename> or git add <folder name> or git add .
to stage absolutely everything in the directory.
Create Your First Version: Save the snapshot by running git commit -m "<commit message>".
This creates a permanent new version in your local Git repository.
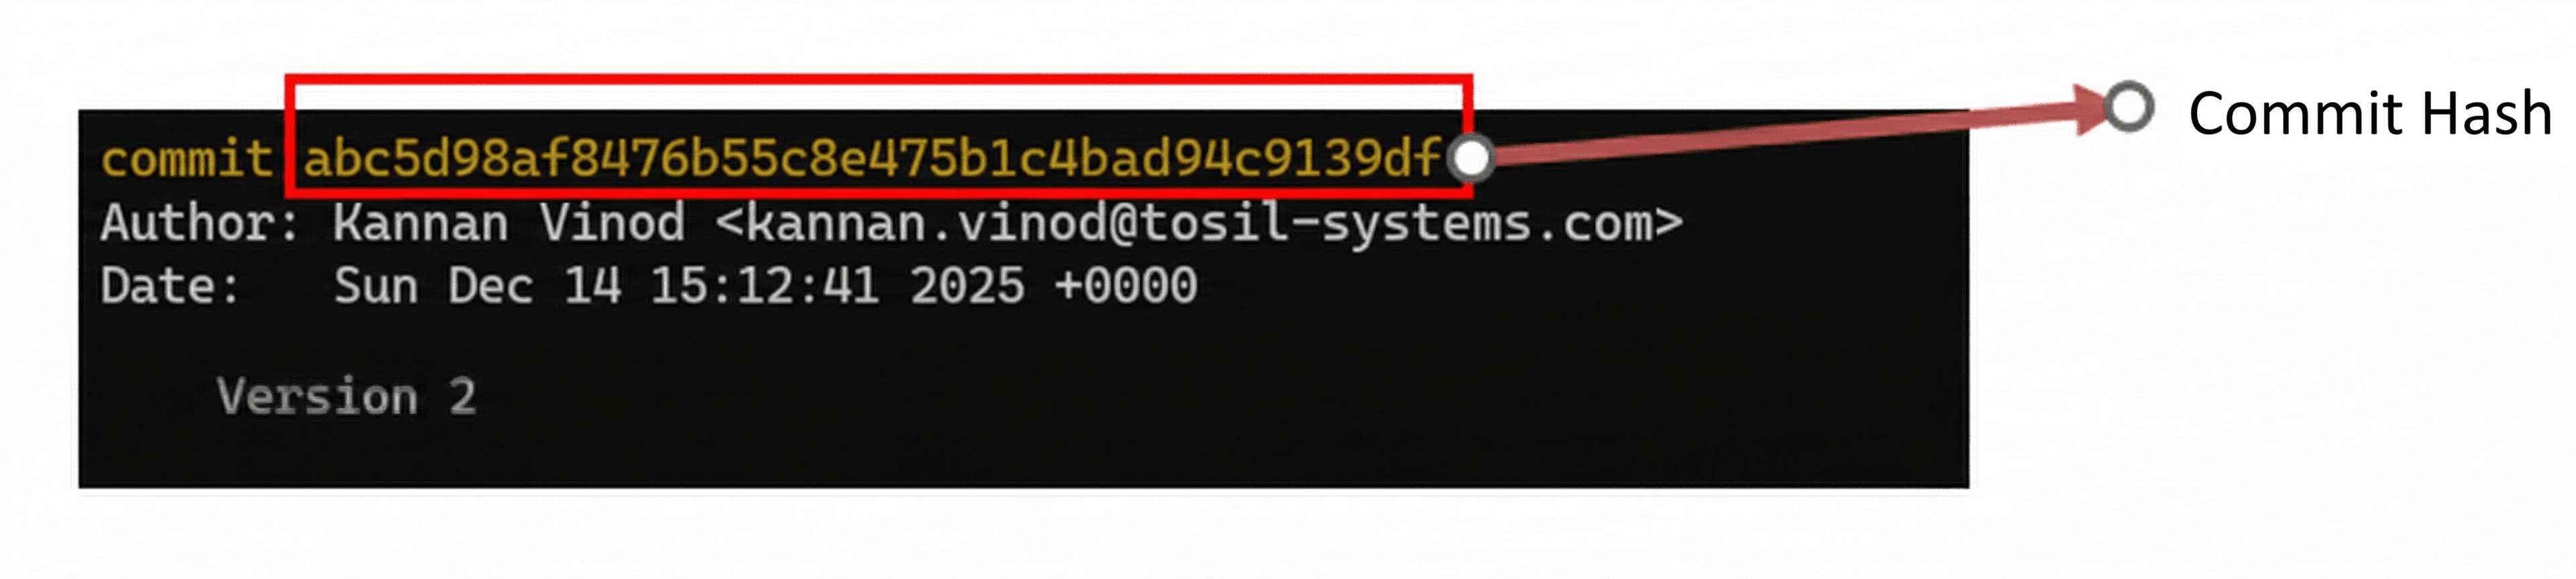
Visualizing and Navigating the Timeline
Professionals do not just guess where they are in a project; they visualize the version tree.
The HEAD Pointer: This is Git's "You Are Here" marker. HEAD points to the exact version you are currently viewing or working on.
Branch Names: A branch name acts as a pointer to the latest version within a specific timeline.
Seeing the Graph: To view a visual representation of your entire version history, including how branches diverge and merge, run following command in your terminal.git log --all --graph

Fixing Mistakes & Switch commits
When you make a mistake, Git provides the tools to clean it up safely:
The "Oops" Fix ( --amend ): If you just created a commit but realized you forgot a file or made a typo in the message, you do not need to make a messy new commit. Simply stage the forgotten files and run,git commit --amend -m "< updated commit message if any >"
to update the last commit. (Note: Amending older commits requires rebasing).
Switch commits (checkout): To switch your entire project back to a specific past version, use git checkout <commit hash>
Restoring a Single File: If you only want to restore one specific file from the past to exactly mimic a previous state, usegit checkout <commit hash> <files to checkout / dir / . >
This brings the old file into your working directory without moving the HEAD pointer backward, allowing you to commit the restored file as a new version on top of your latest work.
Working Clean and Fast
Engineering workspaces gather clutter quickly. Professional workflows automate the cleanup.
Banish Clutter (.gitignore): You can ignore specific files or folders from version history tracking by adding a (.gitignore) file to your project. You can specify exact directories or use extensions (like *.log ) to force Git to untrack them permanently.
Speed Up with Aliases: Typing long commands is tedious. Git allows you to alias commands into simple shortcuts. By running a configuration command like git config --global alias.<shortcut> "<original command>"
you can save keystrokes forever. Examples,git config --global alias.s "status" git config --global alias.cm "commit -m" git config --global alias.co "checkout"
Remove git tracking from project
Remove the .git directory from the project.rm –rf .git
Taking Code to the Cloud (GitHub)
While Git works locally, storing everything on one machine risks data loss from corrupted hard drives. A remote repository on GitHub solves this by providing an online backup and enabling team access. GitHub is specifically designed for Git repositories and offers robust project management features.
Setting Up Your GitHub Repository
Getting started on GitHub is straightforward:
Create an Account: If you don't have one, head to here to create your GitHub account.
Create a New Repository: Navigate to the repositories page in your account and click the "New repository" button.
Configure the Repo: Provide a descriptive name for your repository and click create. During this step, you must choose your visibility wisely:Public: Anyone on the internet can see your repository, but you retain control over who can contribute.
Private: Only you (and the specific people you invite) can see or commit to the repository.
Linking Local to Remote
Once your online repository exists, you need to connect your local project to it. In Git terminology, "local" refers to anything stored inside your computer, while "remote" refers to the online destination.
Establish the Link: Rungit remote add <nickname for remote repo> <remote repo url>
The conventional nickname used by almost all developers is origin.
Verify the Connection: To check the current status of your remote links, use the commandgit remote -v
Publish Your Code: To upload your local commits to the remote repository, usegit push <remote nickname> <branch to publish>
Pro-Tip: To avoid typing the remote and branch name every single time, set the upstream branch on your first push by runninggit push origin <branch name> --set-upstream

Secure Authentication (SSH)
The latest versions of Git no longer support using your account password to authenticate. Instead, you must use either a Personal Access Token or SSH authentication. SSH is highly recommended for a seamless, password-less workflow.
Here is the method to set up SSH authentication:
Generate a Key Pair: Open your terminal and generate a new key using the Ed25519 algorithm, which is currently the most secure and efficient algorithm supported by GitHub. Run the command:ssh-keygen -t ed25519 -C "your_email@example.com"
Save the Key: When prompted to enter a file to save the key, simply press Enter to accept the default location. You can optionally enter a passphrase for extra security, or leave it blank for password-less convenience.
Start the SSH Agent: Ensure the SSH agent (which manages your keys) is running by typingeval "$(ssh-agent -s)"
Add Your Key: Add your newly generated private key to the agent usingssh-add ~/.ssh/id_ed25519
Copy the Public Key: Display your public key in the terminal by running cat ~/.ssh/id_ed25519.pub
and copy the entire output.
Add to GitHub:Finally, go to your GitHub Profile -> Settings. In the sidebar, click "SSH and GPG keys", then click "New SSH key". Give it a descriptive title (like "git-access-key"), paste your copied key into the field, and click "Add SSH key".
The Daily Grind – Push, Pull, and Fetch
Now that your local machine and your GitHub repository are securely shaking hands, it is time to actually move some code. This is where you will spend 90% of your day interacting with Git. Let's look at the essential commands that keep your local code and the cloud perfectly synchronized.
git clone: The Ultimate Download Button
If a repository already exists on GitHub (perhaps a teammate started it, or you are jumping into an existing project), you don't need to initialize a new one. You just need to clone it.git clone <remote url> <optional: directory name>
How it works: This command downloads the entire repository, including its full version history and branches, right to your machine.
Pro-Tip: The directory name is optional. By default, Git simply creates a folder with the same name as the remote repository. You only need to provide a name if you specifically want to override it.
git push: Sharing Your Brilliance
You've written some brilliant embedded C code, you've staged it, and you've committed it locally. But right now, that code only exists on your laptop. To upload it to GitHub, you need to push it.git push <remote nickname> <branch to publish>
(e.g., git push origin feature/sensor-driver ).
The Golden Rule of Pushing: Git push only publishes your saved commits to the remote repository. It does not upload files sitting in your Staging Area or Working Directory. If you haven't committed anything new, running git push will simply tell you "Everything up-to-date".
The Lazy Developer Shortcut: Instead of always typing the remote and branch name, you can set an upstream link on your very first push usinggit push origin <branch name> --set-upstream
Once configured, for all future updates on that branch, you can literally just type git push without mentioning the remote repo or branch.
git fetch vs. git pull: The Classic Mix-Up
When a teammate updates the remote repository, your local machine doesn't automatically download those changes. You have to ask Git to get them. This is where developers often get confused between fetching and pulling.
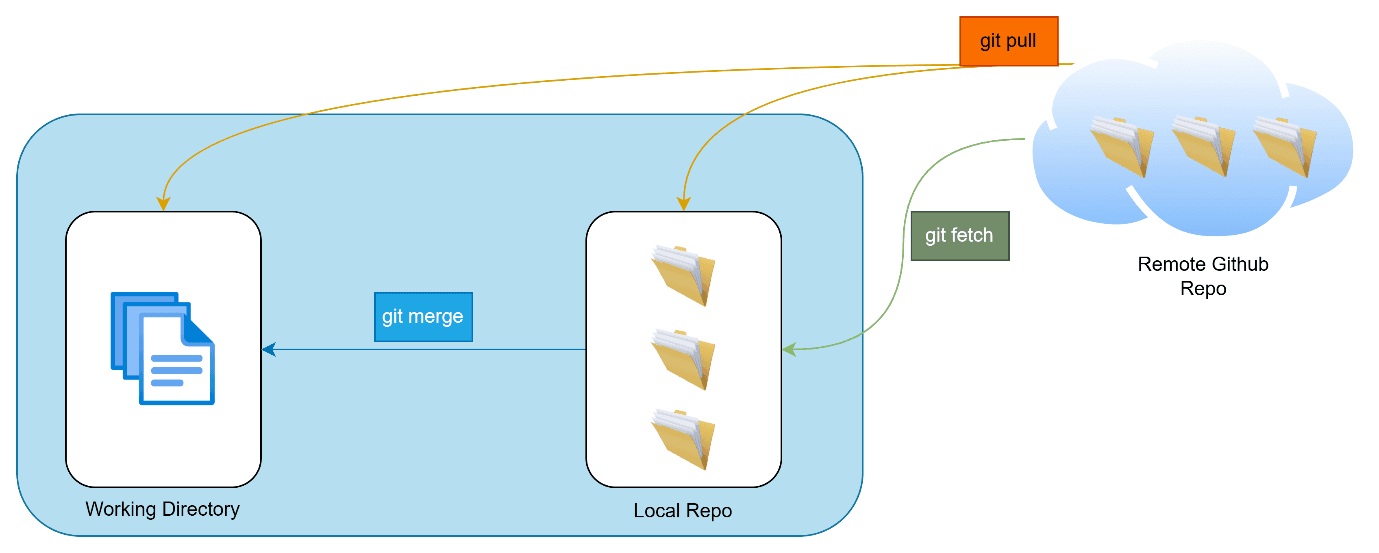
git fetch (Looking Without Touching): This safely downloads the latest history and changes from the remote repository to your local machine, but it does not apply them to your working files. It’s like checking your mailbox: you see what's new, but you haven't opened the envelopes yet.
git pull (The Two-in-One): This command is essentially a shortcut. Under the hood, git pull = git fetch + git merge. It downloads the latest remote changes and immediately attempts to merge them into your current active working directory.
Branching, Merging, and the Art of Collaborative Coding
Up to this point, we have treated Git as a single-player game. But in a professional environment, you are rarely coding alone. This is where the true power and potential chaos of version control come into play.
The Problem: The Collision Course
Imagine you and a colleague are working on the exact same branch. You are deep into developing a new hardware feature, while your teammate is working on an urgent bug fix. Your teammate finishes first, fixing the bug and pushing their code to the main branch before you have completed your feature. What happens when you finally try to push your feature to the remote repository? Git will throw an error. Your local repository is out of sync because the remote repository now contains new references (your teammate's bug fix) that you don't have. To solve this, you need to pull their code first to sync up. But if your teammate happened to edit the exact same configuration file you were working on, Git will halt and throw a "merge conflict". Suddenly, you are forced to stop your development work and untangle a conflict just to save your code.git checkout -b feature/<your feature name>
The Solution: Branching
This is where Git's most powerful feature saves the day
Branching
Instead of tripping over each other, you can create a parallel universe for your code. You commit and push all your changes into your own dedicated branch. After finishing all the work for that feature, you perform a single merge into the main branch. This means you handle any potential conflicts in one clean, predictable step, rather than every time you try to save your work.
The Golden Rules of Branching:
Never work directly on the main or master branch.
Treat main like a sacred, stable version of your code.
Always branch out, do your work in isolation, and merge back only when the code is entirely "production-ready".
To create a new branch and instantly switch your workspace to it, use this command:git checkout -b feature/<your feature name>
Merging vs. Rebasing
So, your feature is complete, or you need to pull in the latest updates your teammates just published. You need to integrate branches. In Git, you have two primary ways to combine code: Merge and Rebase.
Both achieve the same ultimate goal, getting changes from one branch into another, but they do it in fundamentally different ways.
Git Merge: Merging takes the contents of a source branch and integrates it into a target branch. It does this by creating a brand new, special commit called a "merge commit" that ties the two histories together. However, if heavily used by a large team, the project history can start to look like a messy spiderweb.
When to use it: Use git merge when you want to bring a completed feature branch into your main branch. It is a non-destructive operation; the existing branches are not changed in any way, which makes it very safe.
How to do it: Let's say you finished your feature/sensor-driver branch and want to merge it into main.
- Switch to the branch you want to receive the code (the target):
git checkout main - Make sure your local main is completely up to date with GitHub:
git pull - Execute the merge, bringing your feature branch into main:
git merge feature/sensor-driver
Git Rebase: This is the professional’s tool for a clean history. Rebasing is essentially history rewriting. Imagine you branched off main a week ago. Since then, your teammates have added 10 new commits to main. Your branch is now out of date. Rebasing takes your feature branch, lifts it up, and literally changes its starting point to the absolute latest commit on main. It then "replays" your commits on top of that new base.
When to use it: Use git rebase to update your personal feature branch with the latest changes from main before you open a Pull Request. This creates a beautiful, perfectly linear project history that is incredibly easy to read and debug.
How to do it: Let's update your feature/sensor-driver branch with the newest code from main.
- Make sure you are on your feature branch:
git checkout feature/sensor-driver - Fetch the latest updates from the remote repository:
git fetch - Rebase your branch onto the latest main:
git rebase origin/main
During a rebase, if Git finds a conflict, it will pause. Fix the conflict,
run git add .
then git rebase --continue.
The Golden Rule of Rebasing: Never rebase commits that exist outside your local repository. If you have already pushed your branch to GitHub and other people are looking at it, do not rebase it. Rebasing rewrites history, and rewriting history that other people are relying on will cause massive confusion. Rebase your local, private work. Merge your public, shared work.
Rule of thumb: Merge is great for bringing a finished feature into main. Rebase is great for updating your personal feature branch with the latest changes from main before you finish.
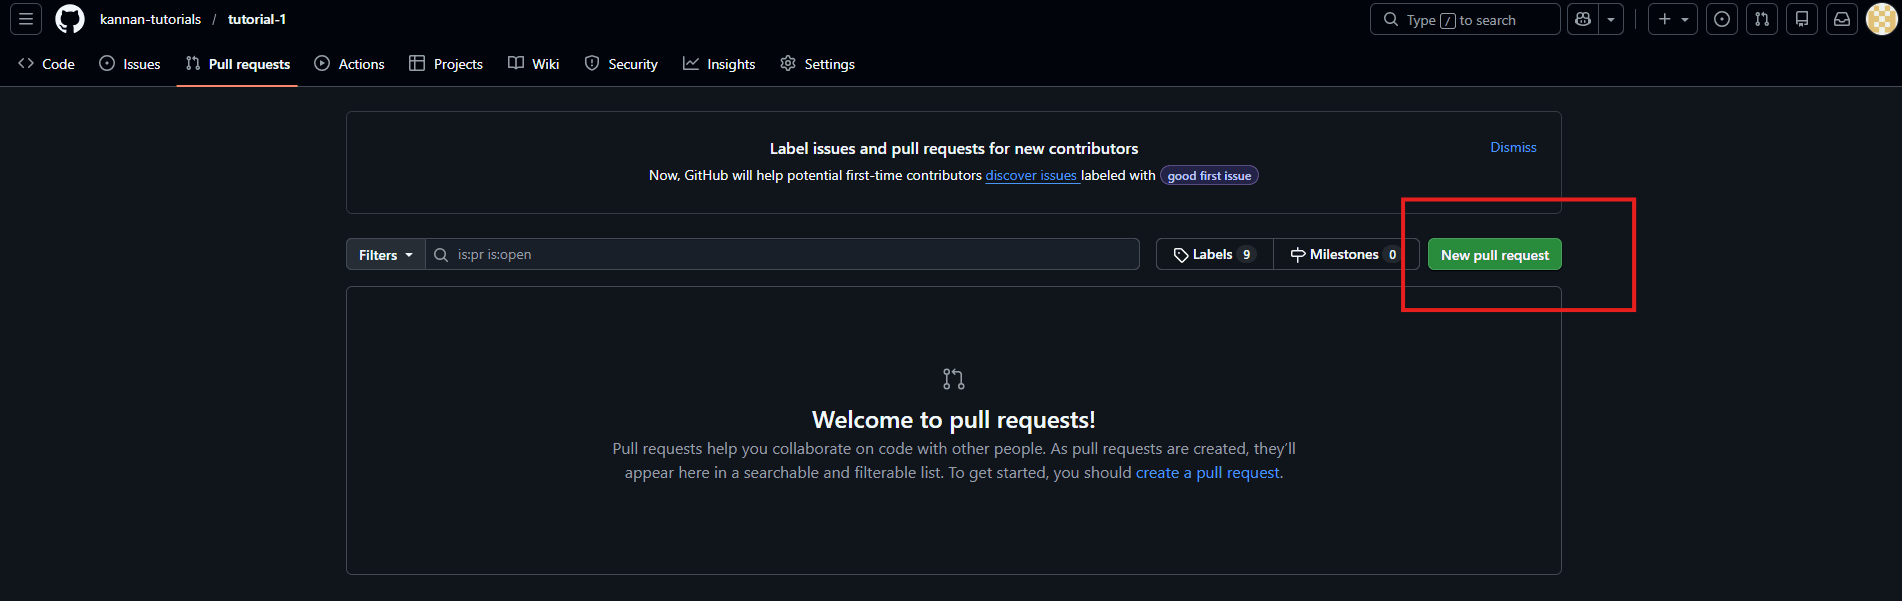
The Pull Request (PR): The Gateway to Main
A Pull Request (PR) is not actually a core Git command; it is a feature provided by GitHub. When you finish your branch, you don't just forcefully shove your code into the main branch. Instead, you open a Pull Request. You are literally requesting that the repository owners pull your feature branch into the main codebase. This is the most critical checkpoint in professional software development. Opening a PR triggers the Code Review process. It allows your teammates to examine your code line-by-line, leave comments, suggest optimizations, and ensure it meets quality standards before it ever touches the sacred main branch.
Conclusion
Whether we are developing bare-metal firmware for custom RISC-V architectures, writing complex flight controller software for micro-drones, or collaborating on intricate RTL designs, our source code is the foundation of our hardware. Git isn't just an administrative tool; it is a safety net that lets us innovate without the fear of breaking the main branch.
By embracing feature branches, maintaining clean histories through rebasing, and engaging in peer code reviews via Pull Requests, we do more than just manage versions. We actively encourage knowledge sharing across the team and set the stage for modern, automated workflows like CI/CD (Continuous Integration and Continuous Deployment).
Let's make saving final_v3_really_final.c a thing of the past. By building a culture of clean version history and confident collaboration, we can spend less time untangling messy folders and more time doing what we do best: building incredible things on silicon.